Behind the Scenes of Camiler.org: A Modern, Dockerized Infrastructure
Most people outside of Turkey probably haven’t heard of camiler.org, so let me give a bit of context.
In Turkey, where the majority of the population is Muslim, mosques—called “cami” in Turkish—are a big part of everyday life. They’re not just places of worship, but also central to community life, especially around funeral services. As you’d expect, people often search online for nearby mosques, prayer times, funeral announcements, and directions.
The interesting part is this: although these kinds of searches happen a lot, the results on Google are surprisingly poor. You mostly get outdated pages, duplicated content, or generic results that don’t really help. That’s what pushed me to build camiler.org—a site that’s fast, searchable, and actually useful.
Now, to be fair, ranking in these search results isn’t particularly hard. It’s what you might call a “low-competition SERP.” But it’s not all upside either. Google tends to show its own boxes—like map results or local snippets—right at the top, which means fewer people click through to actual websites. Still, the lack of good content in this space leaves a clear opening, and that’s where camiler.org fits in.
If you’re curious about the SEO thinking and the broader experiment, I wrote about that here:
👉 An SEO Experiment in a Low-Competition SERP with Google Maps and OpenAI
This post isn’t about keywords or rankings though. It’s about how I put the site together—what tools I used, how I approached the architecture, and why I made certain decisions. Everything from Docker and Redis to Cloudflare and GitHub Actions. I built it all on my own, and in this post, I’ll walk through what that looked like.
Overview of the Stack
When I started building camiler.org, my goal was clear: I wanted a fast, reliable system that I could run and maintain solo—without relying on heavyweight services or getting locked into any particular vendor. I wanted to understand every part of the stack and be able to swap out anything if needed.
So I went with a clean, Docker-based setup built entirely on open source tools. Everything runs on a small-single VPS, and each component does one thing well.
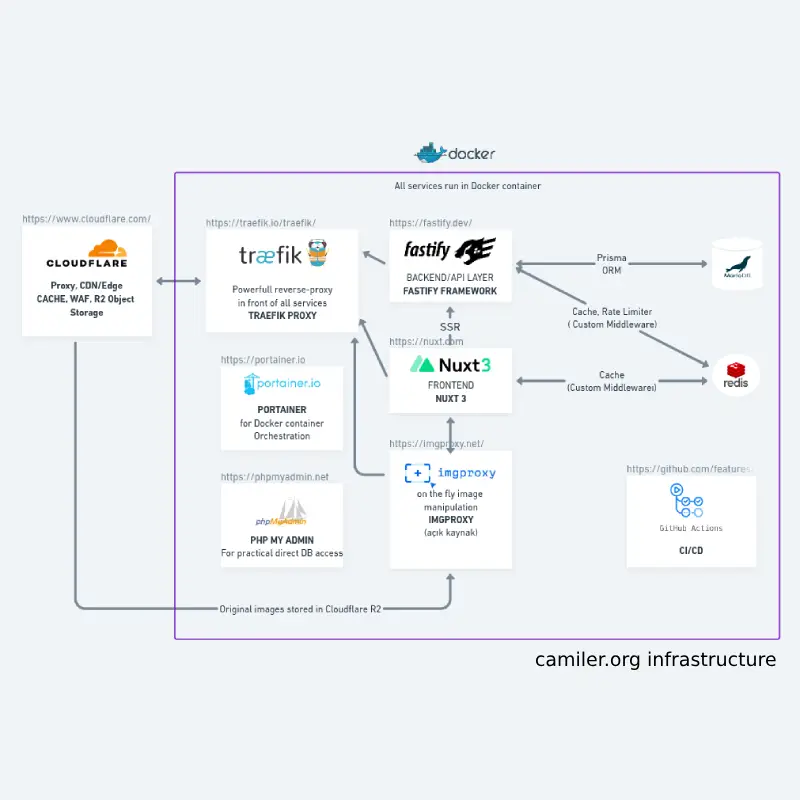
Here’s the rough breakdown:
- Traefik acts as the reverse proxy, handling SSL, routing, and IP-level restrictions.
- Nuxt 3 runs the frontend in SSR mode. I built a custom middleware that caches full HTML responses in Redis for better performance.
- Fastify handles the backend API, talking to a MariaDB database via Prisma.
- Redis is primarily used for caching, but I also use it for things like tag-based invalidation and rate limiting logic.
- imgproxy serves mosque images, resizing and optimizing them on the fly.
- Cloudflare handles edge caching and CDN duties. I also use Cloudflare R2 for object storage. Technically yes, that’s a vendor dependency—but since R2 is S3-compatible, I could switch to any other S3 provider or even a self-hosted MinIO setup if needed.
- GitHub Actions automates deployments—just enough CI/CD for a one-person project.
- Finally, Portainer and phpMyAdmin are in the stack for quick container and database inspection when necessary.
It’s simple, modular, and flexible. I know exactly what runs where, and I’m not locked into anything I can’t replace.
Traefik: Simple, Smart, and Docker-Friendly
Traefik is the first thing that touches any request coming into the server. It’s the reverse proxy that routes traffic to the right container, handles SSL certificates, and takes care of a few basic security rules.
One of the main reasons I picked Traefik is how well it integrates with Docker. You just add a few labels to your containers, and Traefik picks them up automatically—no extra config files, no reloads. For someone managing things solo, that kind of automation is gold.
I use it for:
- SSL via Let’s Encrypt
- Route management based on container labels
- IP-based access control (some internal tools aren’t meant to be public)
- Gzip compression and some default security headers
There are more complex reverse proxies out there, but I didn’t need complexity—I needed something that “just works” in a containerized setup. And that’s exactly what Traefik does.
Frontend: Nuxt 3 + Custom Cache Middleware
For the frontend, I went with Nuxt 3 running in SSR mode. It gives me the flexibility of server-side rendering while still keeping the developer experience clean. But Nuxt’s built-in caching isn’t really enough if you care about performance at scale—even on a modest project.
So I wrote a custom cache middleware to control how pages are cached and served.
Here’s what it does:
- It stores full HTML responses in Redis, so the server doesn’t have to re-render every page on each request.
- To save memory on a small VPS, I compress the data before writing it to Redis. It costs almost nothing in terms of CPU, but significantly reduces memory usage.
- It supports ETag headers, which helps with freshness checks and reduces unnecessary bandwidth.
- Most importantly, it includes tag-based invalidation—which means I can purge related pages when something changes. For example, if a mosque’s info is updated, I can also invalidate the cache for its “nearby mosques” page.
This gave me much finer control over how caching works compared to what Nuxt offers out of the box.
It’s also worth mentioning that there’s a separate caching layer on the client side, built with a mix of Local Storage and in-memory LRU caching. It helps with things like reducing API calls and keeping recently viewed data instantly accessible. But since it’s purely frontend logic and not part of the infrastructure itself, I won’t go into detail here.
This setup isn’t just about speed on the client side—it’s mainly about reducing server load, improving response times, and making more efficient use of limited system resources.
Backend: Fastify + Prisma + Custom Rate Limiter
For the backend, I’m using Fastify—a lightweight, high-performance Node.js framework that’s perfect for projects where you care about every millisecond. It’s easy to extend, has a good plugin system, and doesn’t get in your way.
The API is fairly straightforward: it handles search queries, mosque data, metadata endpoints, and a few internal tools. Under the hood, I use Prisma as the ORM, connecting to a MariaDB database. Prisma gives me type safety, a nice dev experience, and predictable query behavior—which matters a lot when you’re flying solo.
But one thing I couldn’t quite find off-the-shelf was a rate limiter that gave me the kind of control I needed. The existing solutions were either too generic or not flexible enough, especially when you want:
- Different rate limits per route
- Group-based or user-specific limits
- Global fallback thresholds
- Redis-backed counters that survive restarts
So I ended up writing my own custom rate limiter middleware. It plugs into Redis, tracks usage with expiry logic, and gives me full visibility into how traffic is behaving. It’s lightweight, doesn’t introduce much overhead, and I can fine-tune it however I like.
Redis: The Glue Layer
If there’s one component holding everything together, it’s Redis.
I originally added it just for caching SSR responses from the frontend. But as the project evolved, Redis naturally became the place where small, fast-access data lives—things that don’t belong in a database but still need to be shared across services.
Right now I use Redis for:
- Caching full HTML responses with optional compression
- Tag-based invalidation, so I can expire multiple related keys at once
- ETag and SWR support
- Rate limiting, with expiring counters for different scopes (IP, route, global)
- Lightweight state tracking, like whether a purge or update happened recently
And since I’m on a small VPS with limited memory, I compress most Redis payloads before writing. It’s a negligible cost CPU-wise but saves a good amount of RAM in the long run.
I also made sure all logic around Redis is non-blocking and isolated. If Redis goes down, the rest of the stack keeps working. It’s not a single point of failure—it’s an optimization layer.
imgproxy for On-the-Fly Image Optimization
I didn’t want to serve raw images directly from the app. It adds complexity, uses bandwidth unnecessarily, and doesn’t scale well when you need multiple sizes or formats.
Instead, I use imgproxy—a lightweight image processing server that resizes and optimizes images on demand. It pulls the originals from object storage and returns just the version needed for the client: the right size, format, and quality.
This way, I only need to store a single version of each image, and I let imgproxy do the rest dynamically.
Cloudflare: Edge Caching and Object Storage
For both static assets and image delivery, Cloudflare plays a big role in performance and cost-efficiency.
I store all mosque images in Cloudflare R2, which is their S3-compatible object storage service. It works seamlessly with tools like imgproxy.
What makes R2 even more attractive is its generous free tier—especially for a personal project like this. I’ve been using it from day one, and haven’t had to worry about hitting limits. It just works.
On top of that, Cloudflare’s free CDN handles edge caching automatically. Once an optimized image is generated by imgproxy, it’s cached at Cloudflare’s edge nodes around the world. That means the next user gets it instantly, without the request even reaching my server or R2.
This setup keeps traffic off my origin, cuts latency, and keeps the project affordable. And even though Cloudflare is technically a vendor dependency, R2’s S3 compatibility means I can move elsewhere with minimal effort if I ever need to.
CI/CD with GitHub Actions
For deployments, I kept things simple and predictable. I use GitHub Actions to automate everything from building Docker images to restarting containers.
Whenever I push changes to the main branch, GitHub Actions kicks in:
- It builds the Docker image for the relevant service (frontend or backend)
- Tags and pushes the image to my private Docker registry
- Then hits a lightweight webhook endpoint on the server, which triggers a container restart with the new image
That’s it. No fancy pipelines, no third-party CI/CD platforms, and no SSHing into the server to pull code manually. It’s fast, quiet, and works every time.
For a solo project, I’ve found this to be the perfect balance: fully automated, but still transparent. I know exactly what’s happening, and if something breaks, I’m just one log file away from understanding why.
Admin Tools: Portainer and phpMyAdmin
Even though most of the stack runs smoothly on its own, I still need some basic visibility into what’s happening under the hood—especially during development or debugging.
That’s where Portainer and phpMyAdmin come in.
Portainer gives me a web-based UI to monitor and manage Docker containers. I don’t use it for deployments or orchestration, but it’s great for quickly checking logs, restarting a misbehaving container, or keeping an eye on resource usage.
phpMyAdmin, on the other hand, is strictly for local or IP-restricted use. Sometimes I just want to inspect a table or run a manual SQL query without firing up a terminal or writing scripts. It’s not fancy, but it gets the job done when I need it.
Neither tool is exposed publicly, and I treat them as optional helpers—not core infrastructure. But when you’re working solo, having a visual layer like this can save time and prevent mistakes.
Final Thoughts
I didn’t set out to build a complex infrastructure. I just wanted a fast, useful, and maintainable site that could fill a real gap in the search landscape—without relying on big platforms or managed everything-as-a-service offerings.
That mindset shaped every part of this stack. I leaned on open source tools, stayed close to the metal with Docker, and used Cloudflare where it made sense—especially for edge performance and low-cost storage. Every piece serves a clear purpose, and nothing feels like overkill.
Yes, it’s all running on a single VPS. Yes, I wrote and maintain everything myself. But that’s kind of the point: with the right tools, you don’t need a team of engineers to build something reliable and scalable.
If you’re thinking about launching a project in a niche space—or replacing something bloated with something smarter—this kind of setup might be all you need.
And if you’re curious about how I handle things like tag-based cache invalidation, compressed Redis payloads, or my custom rate limiter, those will be the focus of upcoming posts.
Thanks for reading.